
PART 19: A DRIVERS PERSPECTIVE
Finishing the Dash and a little HVAC work.
| After taking care of some of the small things and having sourced
some more parts from the junkyard I went ahead and reinstalled the heater
core and blower motor - I want heat in the car for winter events. The blower
motor was tricky as it wouldn't clear the roll bar front down tube (Right
red arrow in pic). Probably why it wasn’t installed in the car when I picked
it up! A little bit of trimming of the blower motor box and
it was wedged into place. I also fabbed a short duct to fill the gap where
the A/C condenser used to be with some AL dryer pipe from the local hardware
store. I think it was 8 inch pipe. I also fitted the left and right defroster
ducts with the unneeded holes suitably taped over (Left arrow in pic). |
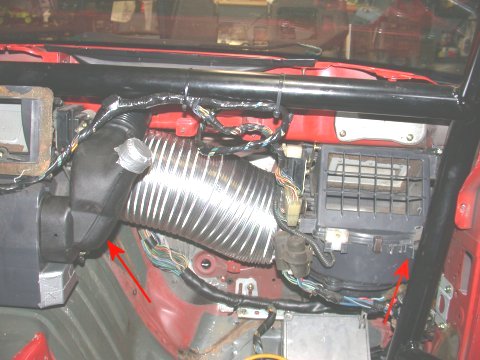
The components needed to get heat to the driver. |
With the heater core and blower motor mounted, and the defroster
ductwork fitted, so I could have a working windshield defroster (and
backup radiator - which is what the heater core is), a little
wiring work was in order. The wiring harness that runs behind the dash
for the HVAC components also contains all the sound system head unit wiring plus
extras like the cigarette lighter power and some other dash lights (glove
box, ashtray, cigarette lighter, etc.). I decided to weed out all the extra
wires, just for simplicities sake and it only took about 30 minutes - it's
a short harness. The pins in the big connectors can be removed by inserting
a small flat tipped screwdriver from the pin side of the connector (not
the wire side) and releasing a small locking tab. With the tab released
the pin (and wire) can be slid out with a gentle tug.
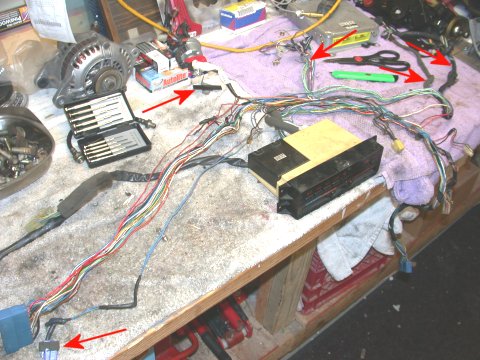

Weeding the HVAC wiring harness: before (left) - arrows
showing unneeded wires and after (right) - arrow showing left leftovers.
With the the “stripped” wiring harness plugged in I could temporarily
reinstall the dash...to make it useable - there is more work to do (wiring
some more gauges like I did in Rusty) but it can wait until later. The
dash BTW will have to be replaced eventually as it is pretty trashed and
will not meet ITS regs - too much has been cut out of it and much of the
mounting tabs for other components have been broken or cut off. The dash,
believe it or not can be fixed in place by only eleven 10mm bolts (2 by
each a-pillar, 2 on either side of the transmission tunnel, and three on
top of the dash itself)

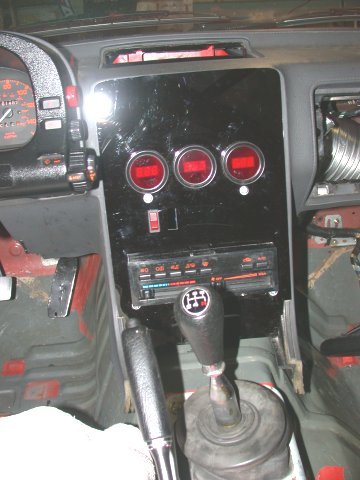
Dash installed (left) fitting gauge panle and auxilliary gauges anbd switches
(right).
Easy In, Easy Out
Next up was the quick release steering wheel hub and steering wheel.
Egress in an accident has always been a concern of mine and exiting a car
quickly with a fixed steering wheel can be tough. So a quick release
steering wheel hub was on my short list of thinsg to install.
I waited 6 months for the QD hub and adapter from a company called TekniqAuto in Canada.
They call it their "Snap-Off System."
Two versions available, a street version with a key lock (advertised
for security purposes) and a race version...well for race cars. Why the race version
is more expensive escapes me though.
I bought, for obvious reasons, the race version without the key lock.
I splurged a little and bought this as a new part and at over $180 it wasn’t
cheap. And this was even as part of a group buy! But having the QD makes
getting in and out of the car MUCH easier. The install is a piece of cake,
merely a case of unbolting the OE steering wheel and bolting the hub adapter
in it’s place. Oh, and there is no horn wiring to worry about in this car.
The QD then bolts to hub adapter and your new racing steering
wheel. In my case a Momo Fighter 350mm wheel I bought used. I actually bought two wheels
as a package deal for $150 but I'm going to try the Momo first. The otehr wheel is a 320mm
Sparco "D" ring and is pretty small. The only drawback with the QD set up
is that the steering wheel is about 1 inch closer to the driver than before.
I have short arms so no issue for me.
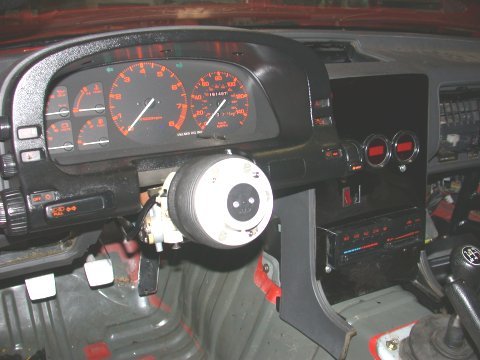
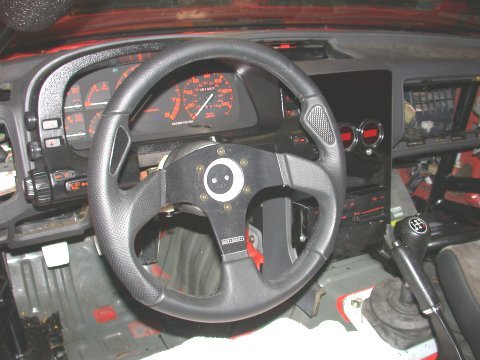
Hub adapter and QD baseplate mounted (left) Momo steering wheel on QD disconnect.(right)
LazyBoy
No race car would be complete without a nice race seat. In fact it wouldn't
be a race car without a race seat. As it would so happen I picked up a
brand new Sparco EVO seat that was being sold for $400. Not cheap but it
is an awesome seat and as with parts of this kind, can be used in any subsequent
car later on down the road when RC expires. Since RC
was already fitted with a race seat (Kirkey since sold) I had floor brackets
already made. The EVO however is a side mount seat -the Kirkey a bottom
mount. Off to eBay I went and bought a set of used Sparco side mount brackets
for $25 and they fit the seat perfectly...obviously. I had to drill a few holes
to fit the Sparco side brackets to the floor mounting bracket but this
was fairly straight forward. The Sparco side brackets look like swiss cheese
there are so many bolt holes, so any future adjustment for front to rear
position as well as overall height and rake should be easy enough.
When it comes to the weight question lest just say the stockers are heavy
and the fibergalss is light. The Kirkey was pretty light also but not as
light as the featherweight Sparco. The mounting bracket onthe other hand
could be lighter and who knows maybe someday I'll fab something out of
AL to replace the steel parts currently employed.
While the seat was going in I installed the 6 point drivers harness.
These were purchased as new items. They are dated and have a shelf life.
Buying used is a bad decision anyway you look at it. These were bought as
part of a group buy so some pennies saved here. Basically your standard 3" webbing,
6 point Sparco harness with camlock lever quick release. Not
to much to the install here either. Shoulder belts are wrapped (properly) around
the roll bar, the lap belts go to the rear OE seat belt anchors points, and
the two sub belts are mounted to the rear seat mounting bolts. No drilling, hacking,
or other butchery necessary for thre install. While rounding out the interior
I padded all the roll cage tubing that would be considered any potential threat to the
driver...took me 8 sticks of padding to get everything I wanted to! There are a
few more things to hook up in the interior like the window net, maybe a wide angle
racing rear view mirror, a shift light, and I do need to eventually disable the
steering wheel lock but that will be added to the To-Do list and done later.
That pretty much does it for the basic interior niceties.
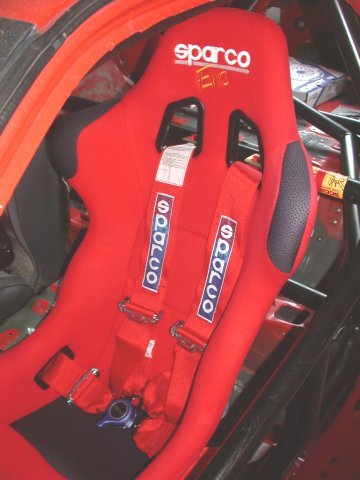
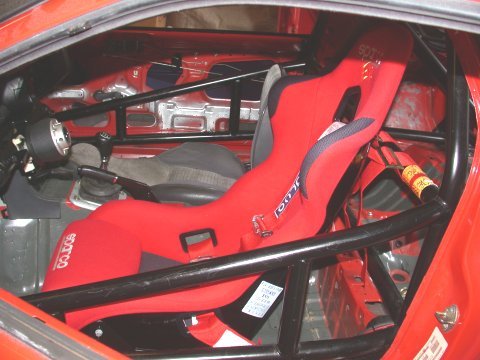
Apologies no pics of the mounting bracket bracket. No roll bar padding shown.
Chapter
I: To Begin the Hooptie to Hotrod Saga: Part 1 of the First 16 Installments
Chapter
II: The Saga Continues, A Good Rear End: Part 17
Chapter
II: Ritual Cannibalization: Part 18
Chapter
II: A Drivers Perspective: Part 19
Chapter
II: The Final Touches?: Part 20
Chapter
II: Drum Roll Please...How Much Did it Cost?: Part 21
BACK TO THE MAIN PAGES AND THE 3RD GENERATION RX-7 STUFF
7-UP CLUB
MAIN
OUR "LOCAL7"
COMMUNITY | THE
WORLD OF THE RX-7
If you would like to contact me and converse about my experiences
with my RX-7's:
please feel free to send an e-mail to crispyrx7@yahoo.com
This page last updated May 3, 2004
Disclaimer: All images contained on this page are
the sole property of C. Regan.


