

Brakes. Can't live without them. And the harder you drive and the faster you are on the track the more you come to
appreciate good, consistent brakes. Before launching into the installation of the dedicated brake ducting
I'll say that the stock brakes on the FD are very good. Good enough for most track activities, provided decent fluid
and track pads are used, and certainly good enough for street duty. However, strap on big, wide, sticky track tires,
up the hp (faster top speeds), and the stock brakes become a weak link. They overheat the pads, they overheat the
fluid, and as in my case you destroy brake rotors. There is a two pronged solution. First is to up the size of the
brakes while maintaining, as close as possible, the stock brake bias front to rear. Maintaining a good brake bias, the stock
bais is pretty good, will ensure you don't make braking worse, as in longer braking distances, due to overworking one end
of the car's brakes over the other. You want the brakes to contribute to stopping the car equally, not the same amount, just equally.
In a perfect world, all 4 tires should be on the threshhold of lockup at the same time under full-on braking.
In my case I've added bigger front brakes and
bigger rear brakes. The bigger brakes add larger rotor surface area for braking
sensitivity and "grip," and the larger mass of the rotors are better able to absord the tremendous amount of heat energy
imparted to the rotors under hard braking.
The second prong is the keep the brakes cool. Brakes are merely the mechanism for
converting the kenetic energy, from speed, to the potential energy, of heat. So the better the brakes are at sheding the heat the
more efficient they will be. Trouble is it's hard to get air to the brakes themselves to shed that heat energy.
The inability of the braking *SYSTEM* to shed the heat is what results in overheated components, and as I can attest
to the worst results beside have brake failure onthe track, is cracking brake rotors. The rotors, literally get so hot,
that when the metal expands and contracts over a few cycles it cracks. Big cracks require rotor replacement. Equals $$$.
The solution is to get cooling air to the brakes.
The primary concern is cooling of the front brakes. The rear brakes do a smaller portion of the overall
braking so do not have the magnitude of heat energy imparted to them that the fronts do.
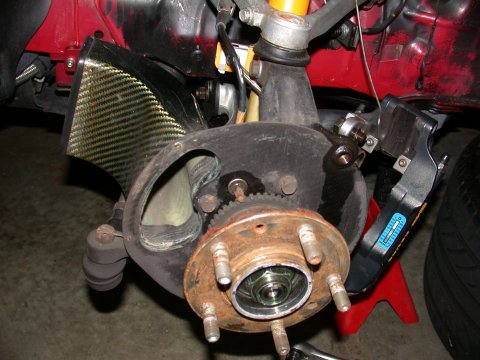
The stock front brakes come with a backing plate, mainly for protecting from debris and such. They offer little if
any means for cooling the brake rotors. Add wider front wheels and they become more of a hinderance to heat rejection
than a help. An intermediate solution that I have been using for many years with moderate success (certainly good enough
for high performance driving and 90% of track use) was the CWR brake ducts.
These carbon fiber "scoops" pulled airflow
from insude the wheel area, but from outside the inside of the wheel, and ducted it straight to the center of the brake rotor
itself. At this point the internal cooling vanes of the rotor, when turning, will act like a turbine and pull the cool air
through the rotor and reject the heat. Was scooping air from the wheel well effective? Certainly, provided air is
routed to the wheel well. I had cut holes in the fender lines to allow airflow through the oilcoolers to pass unimpeded
into the wheel well area. Add to this the OEM ducting from the front lip and the wheel well area got a good deal of
airflow. Enough to feed the CWR ducts and provide for a good amount of rotor cooling.

Was this enough for me? Apparenlty not. Wide Hoosier tires, big brakes with aggressive brake pads, faster top speeds
due to a big bump in power output from the single turbo install, and a bit of improvement form the driver, put a hurtin' on
my front brake rotors which after, perhaps a dozen track days had significnat cracking warranting their replacement.
I decided the brakes needed more cooling. Thus it was time to up the ante to dedicated front brake ducting. This is
essentially grabbing clean air and piping it directly from the high pressure area in front of the car to the rotor
itself. The more the better.
I should caveat that the brake ducting I installed is a compromise. My car is, what I would define as a high
performance street car, that just so happens to be a pretty good performer on the track also. Since it is a street
car, this is why it still has a full interior, air conditioning, a sound system, and lacks the REALLY hardcore exterior
of a racecar - like a GT-style wing, etc. As such, I felt restricted to use the openings in the OEM front lip to
grab the air for the ducting. These openings are fairly small. Openings twice their size would have been better,
but I believe it would destroy the look of the front of the car. Similarly finding the space to route the ducting
hose is difficult. Much hacking and cutting could have been done, but would have required removal of components,
or compromising other "street friendly" aspects of the car. So I did the best I could.
This installation was one of the trickiest I've had to do. There is simply NO space for any of this setup.
Even though I mentioned a reluctance to cut or hack my car to make this work there was still a fair amount of
cutting to the "oil cooler" undertrays to make room for the ducting. Add to this a fair amount of custom
work with the scoops themselves and this whole exercise was fairly time consuming. So lets begin with the easy part.
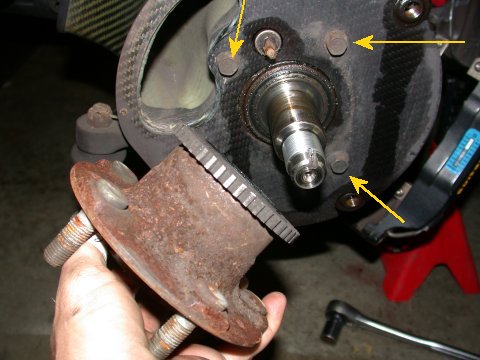
Remove the wheel, remove brake pads and hardware, unbolt the caliper and hang the caliper from a suspension arm with a
coathanger (DO NOT LET IT HANG BY THE BRAKE LINE!!!!), and then remove the wheel hub/bearing to get to the backing plate.
The hub nut is a 32mm IIRC.


With the brakes and hub out of the way, remove the 3 10mm bolts (yellow arrows) and the old backing plate (CWR ducts in my case)
can be removed. A few words about the the NTech ducts. These are SOLID pieces. Made from SS they are build to last
(although the welding could have been better) but they are HEAVY, especially when compared to the CWR carbon
fiber ducts which are works of art and feather light. I was also a bit dissappointed with the orafice opening
in the back of the NTech duct compared to the CWR duct, the CWR duct opening being almost twice as large.
In defense of the NTech ducts, they fit right inside the rotor center (eye) whereas the CWR ducts had to be positioned to fit
flush against the rotor surface rather than sitting inside the eye. The larger orafice however still being the better compromise.

The new backing plates are bolted in easily but in order to push the backing plate flush to the rotor and almost into the rotor
eye two washers were used at each bolted between backing plate and hub spindle. The backing plates could not be moved any closer
to the rotor or else there would be a clearence issue with the ABS ring gear.

I don't think I woudl have undertaken any of this project if it hadn't been for a good friend of mine Grant Moyer.
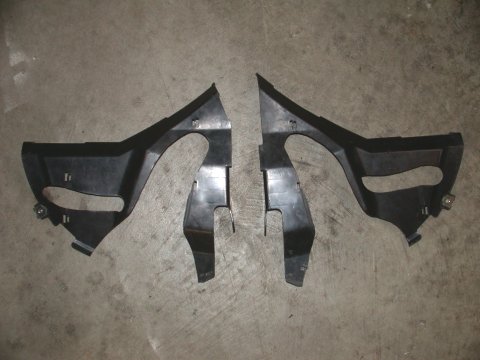
Seems our Mr. Moyer had some spare time on his hands and whipped up a CAD drawing of some prototype ducts to mate with the stock
'99 front lip spoiler. And hey whattaya know he also had access to a rapid prototyping machine (lucky b*st*rd!). He
noodled with the design a bit and got to something useable, pictured below. It's not a perfect fit but more importantly
out of the goodness of his heart made me a pair. "Good enough," I say!


The issue I faced was how to secure these prototype scoops to the back of the front lip spoiler as there were no tabs
or means of fastening them short of drilling holes in my new '99 bumper...which I didn't fancy at all. Now I have lots of
good friends, and Dave Newbern, curious as to these brake ducts I was installing offered to come over and oversee my work.
Good thing he came over too as his brilliance led to the fabrication of the brackets to hold the brake ducts to the
lip spoiler. Nothing that a couple of clips and a bent piece of aluminum can't fix.

 The scoop mounting bracket.
 The scoop installed to the existing lip retainer bolts [left] and an illustration
of the smaller than optimal size of the scoop. [right]
 The corner of the fender liner and undertray were trimmed [left]
and the routed hose with flashing to protect the hose from tire rubbing [right]
With the hoses routed and in place to the best of my ability the last thing to do was to refit the oil cooler undertrays.
The primary reason for refitting the trays was to give some support to the lower edge of the fender liner, and the outboard
portion of the front bumper. As you can see from the pictures the cutting necessary to refit the trays was fairly
radical and there isn't much material left. But what is left provides a good amount of support to the surrounding parts
and does provide some sealing of airflow into the oil cooler. Not much but certainly better than nothing.

 Not a whole lot left of these undertrays.[right]
 Not much to see other than the good amount of ground clearance.
TRIPLE-R
MAIN PAGE
GENERAL
OVERVIEW | THE
HEART OF THE BEAST | STOPPING
AND TURNING | THE
COMFORT ZONE