Information contained above this line was not
contributed by the owner of this site

INSTALLING AN OIL PAN BAFFLE PLATE
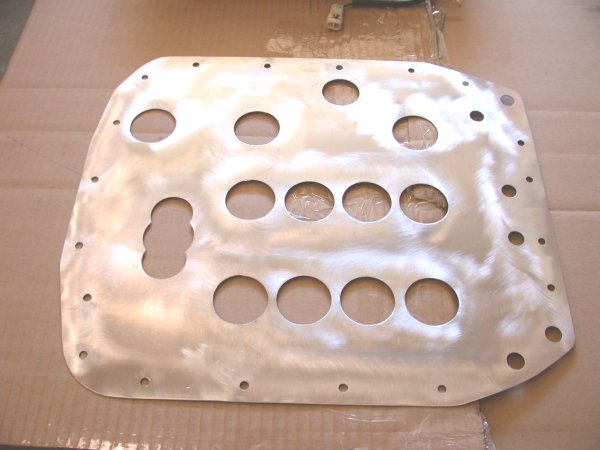
 "Auxilliary" Oil Pan Baffle Plate
| In what seems like the never ending saga of how to
manage oil pickup in the filler neck and PCV system and subsequent
overfilling of my oil catch can,
(See HERE
for actions taken so far and install notes for the oil catch can
itself) I installed a more robust oil pan baffle plate. Would this cure
the problem? I was willing to try anything at this point. The baffle
plate itself was custom made by PFS for another client who decided
not to use the plate at which point I ended up buying it, but it really isn't much more than
1/32" AL drilled with holes and with a bolt pattern to match the OE pan.
I could duplicate one in about an hour for a few dollars. No rocket science here.
As for the installation, same effort as what it would take to install a new
oil pan gasket. So lets begin. First off hang/support the motor.
|
 Behold the homebrew engine support SST, AKA steel pipe, C clamp,
and blocks of wood.
 |
So with the engine supported, time to start removing parts (oil was drained the
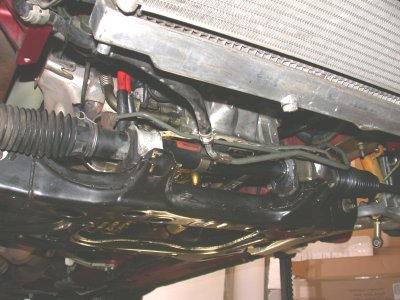
night before): undertray, swaybar, disconnect
steering rack mounts (it's easier this way IMO), remove the front wheels and unbolt the
motor mounts from the engine subframe. Next unbolt the engine subframe and let it hang.
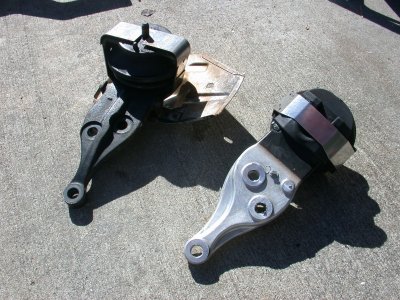
Unbolt and remove the two motor mounts (good opportunity to check those mounts too).
Disconnect the oil level sender - electrcial connector. Unbolt the oil pan. By pulling down on the
subframe there is just enough room to remove the oil pan. Simple, yes? Sure.

 Engine mounts. With Oil Pan Removed.
Poking around under the now panless motor there isn't a whole lot of anything to see.
Merely the oil pump chain and the oil pickup are exposed. Oil drains can be seen
on each corner on the end plates and on the outsides of the center section
but that's about it. Then there is the OE oil pan which is pretty well baffled from the
factory which can be seen below. Will the additional baffle plate help at all?
Next up is to get to work scraping all the old gasket and or gasket sealant
stuck to the pan and block. This takes the longest of any part of this exercise.
With everything cleaned up it's time to install the baffle plate.

 The underside of the panless motor. The OE oil pan insides.
Installing the new baffle plate is very straight forward. First remove the oil pickup.
I decided to use gaskets for my install but the FSM says you can seal the oil pan
using just sealant or using sealant and a gasket. Two gaskets are needed - baffle plate
to block and oil pan to baffle. You MUST use GREY RTV sealant. I chose to use the OEM
sealant which is unbelievably expensive at $40+ per tube! I also saw OEM "type" grey RTV
sold at the local hardware store for about $5. It's always suggested
that one do a dry run install with no sealant before hand to make sure everything
lines up. If all looks good only then get ready to install gasket,
baffle, and sealant to the block. Bolt this down using the oil
pan bolts to "seat" the baffle plate. Reinstall the oil pickup.
Now remove all the oil pan bolts again. Prepare gasket, sealant, and oil
pan for installation. Pull down on the subframe and slide in the gooped up oil pan.
This is where having an extra set of hands helps. Bolt the pan down and torque the pan bolts.
Then goop up the motor mount bolts with RTV and install the motor mounts to the bottom of the motor.
Torque the bolts. The rest is mere reassembly. One suggestion though is that the motor mount
bolt holes in the subframe are different - round on one side and oval on the other. Guide
the motor mount stud into the round hole first then work the motor mount on the other
side in. The only other caveat is to let the car sit 24 hours before
adding oil and restarting the engine - I left a note on the steering wheel reminding myself
to add oil before starting! And there you have it.
 The installed baffle plate before oil pan mounting.
And now for the million dollar question. Did it work?!?!?!!? Well yes and no. Did it
cure the oil slosh/pickup problem? Not entirely. But it did allow me to run entire
30 minute track sessions and only "loose" a half a quart of oil per session.
This to me was satisfactory. And what's more the catch can did not overfill and therefore
no more oiled down rear tires! Simpy drive the car like you stole it. Will this idea
work for everyone? No guarantees. As I have seen what will work for some does not
necessarily work for everyone.
TRIPLE-R
MAIN PAGE
GENERAL
OVERVIEW | THE
HEART OF THE BEAST | STOPPING
AND TURNING | THE
COMFORT ZONE
7-UP CLUB
MAIN
OUR "LOCAL7"
COMMUNITY | THE
WORLD OF THE RX-7
This page last updated November 5, 2003
 rotorphiles have visited this page since October 18, 2001
If you would like to contact me and converse about my experiences with
my 7:  please feel
free to send an e-mail to crispyrx7@yahoo.com
Disclaimer: All images contained on this page are
the sole property of C. Regan or were collected from the public domain,
unless otherwise indicated. If any image contained on this page is considered
private property. Please contact Christopher
Regan.Webcounter supplied courtesy of 


