

One of the secrets to killer brakes is not just at the wheel end but in the master cylinder end also. Without delving into the specifics of a braking force calculation, simply consider that brake caliper piston force (rotor clamping force) is a function of pedal force. It is the ratio of master cylinder piston size to brake caliper piston size that gives you the multiplication of pedal force to clamping force needed to squeeze the brake rotor. Now what happens when we upgrade to a brake caliper that uses larger pistons with more "surface" area, like my recent AP Racing Front brake upgrade, the master cylinder must use more motion to move enough fluid to move the larger pistons in the caliper. This results in longer brake pedal travel and less sensitivity in pedal feel to get the equivalent braking to the OE ratio. The fix is to upgrade to a larger master cylinder. A master cylinder with a larger piston will push more fluid for the same pedal travel to accommodate the bigger pistons in the larger brake calipers. Commensurate with this is better brake "feel" as it takes less pedal travel to get the same amount of braking. Confusing? Trust me...it works. I might even recommended this upgrade with the stock brakes as it will yield a much more sensitive pedal feel and reduce the pedal throw.
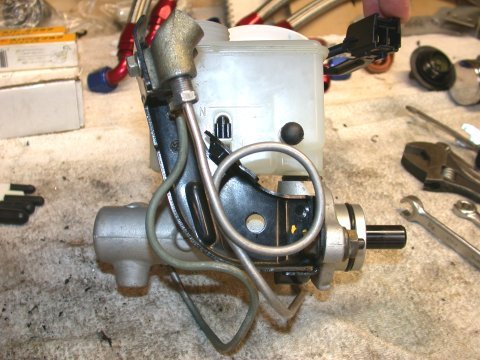
Where can one source a larger master cylinder that does not require a complete redesign of the stock system? Mazda has been kind enough to accommodate our needs. The master cylinder from a 1993 Mazda 929 ABS equipped sedan (pn: HG-31-43-400G) fits almost perfectly. These can be had for about $170 new or about $100 for a rebuild. The 929 master cylinder uses a 1" piston vs the RX-7 unit which uses a 15/16" piston as can be clearly seen in the picture above. It's cast right into the master cylinder body.
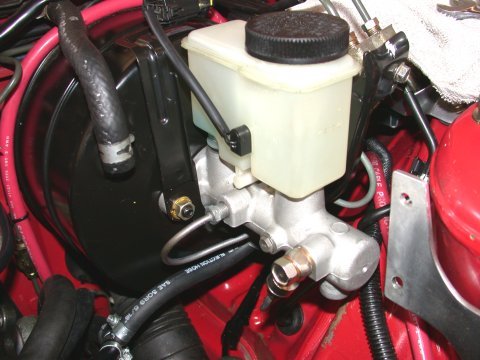
Removing the old Master cylinder is straight forward but to save time and effort at the end of the install it would behoove you to cap the brake lines as soon as the lines are disconnected. The last thing you want to do is spend days bleeding air out of the ABS unit. Before disconnecting the lines suck out as much fluid from the reservior as possible with a turkey baster. Disconnect the brakes lines at the connection block on the bracket and cap the lines. Disconnect the clutch master cylinder line at the reservior and plug the line with a bolt and cap the master cylinder reservior ASAP. Brake fluid and automotive paint don't like each other very much. The master cylinder is held to the brake booster by 2 nuts. This will disconnect the master cylinder and "short" brake line mounting bracket from the brake booster. Don't forget to disconnect the fluid level sensor.


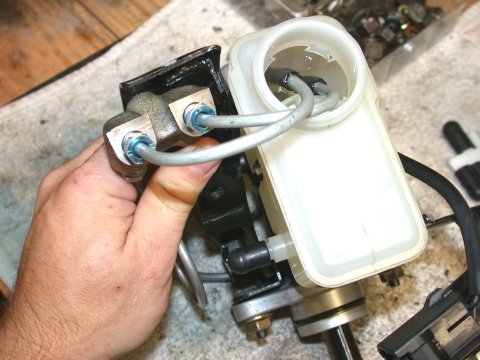
As can be seen above there is a difference in master cylinders. Specifcially where and how the "short" brake lines are attached. So some custom brake line fabrication is going to be needed. Not really a big deal but for most it will be a learning experience. On the new 929 MC there is one banjo fitting, now on the side opposite to that on the RX7 MC, and one flare fitting where there once was a banjo fitting. DO NOT try to fit the old banjo fitting where the flare fitting is needed. For the line where the banjo fitting has merely swapped sides of the MC some gentle bending of the original brake line will get the line to fit. The line that requires a flare fitting will require a new line be made. A 14-16inch line from any local autoparts store will do for starters. A 12inch line might work but getting the bends right will be harder. Bend the line with a tubing bender to the desired configuration. If extra line remains (if a 14-16 inch or longer line ws bought) cut the line to length and be sure to ream the cut end well to remove any rough edges. Slide on the fitting and using a **DOUBLE FLARING TOOL** flare the end. Double flaring the end is of utmost importance - DO NOT use a single flare on this brake line connection. Fit the new line to the 929 master cylinder and bracket.


All that remains now is to remove the reservior from the RX7 MC and fit to the 929 MC. Simply pry it out without damaging the rubber seals and pop it into the 929 MC - a little brake fluid on the rubber seals helps it slide in easily. With the reservior fitted and full with fluid (cap the clutch line nipple) it's time to bench bleed. You have to bench bleed or else you face an eternity trying to bleed all the air out of the brake system when everything is reconnected. I used two pieces of brake line, a fitting on one end and a piece of rubber hose on the other, connected to the brake line connector block and plumbed back into the reservior. The tips of the line must be below the fluid level in the reservior. Push the MC plunger a few times until no more bubbles come out of the lines and the MC has been successfully bench bled.


With the master cylinder bleed merely rebolt the MC to the brake booster, reconnect the brake lines and
clutch line, connect the level sensor, and rebleed the entire brake system and the clutch system. Check for leaks then go for
a test drive.

TRIPLE-R
MAIN PAGE
GENERAL
OVERVIEW | THE
HEART OF THE BEAST | STOPPING
AND TURNING | THE
COMFORT ZONE